
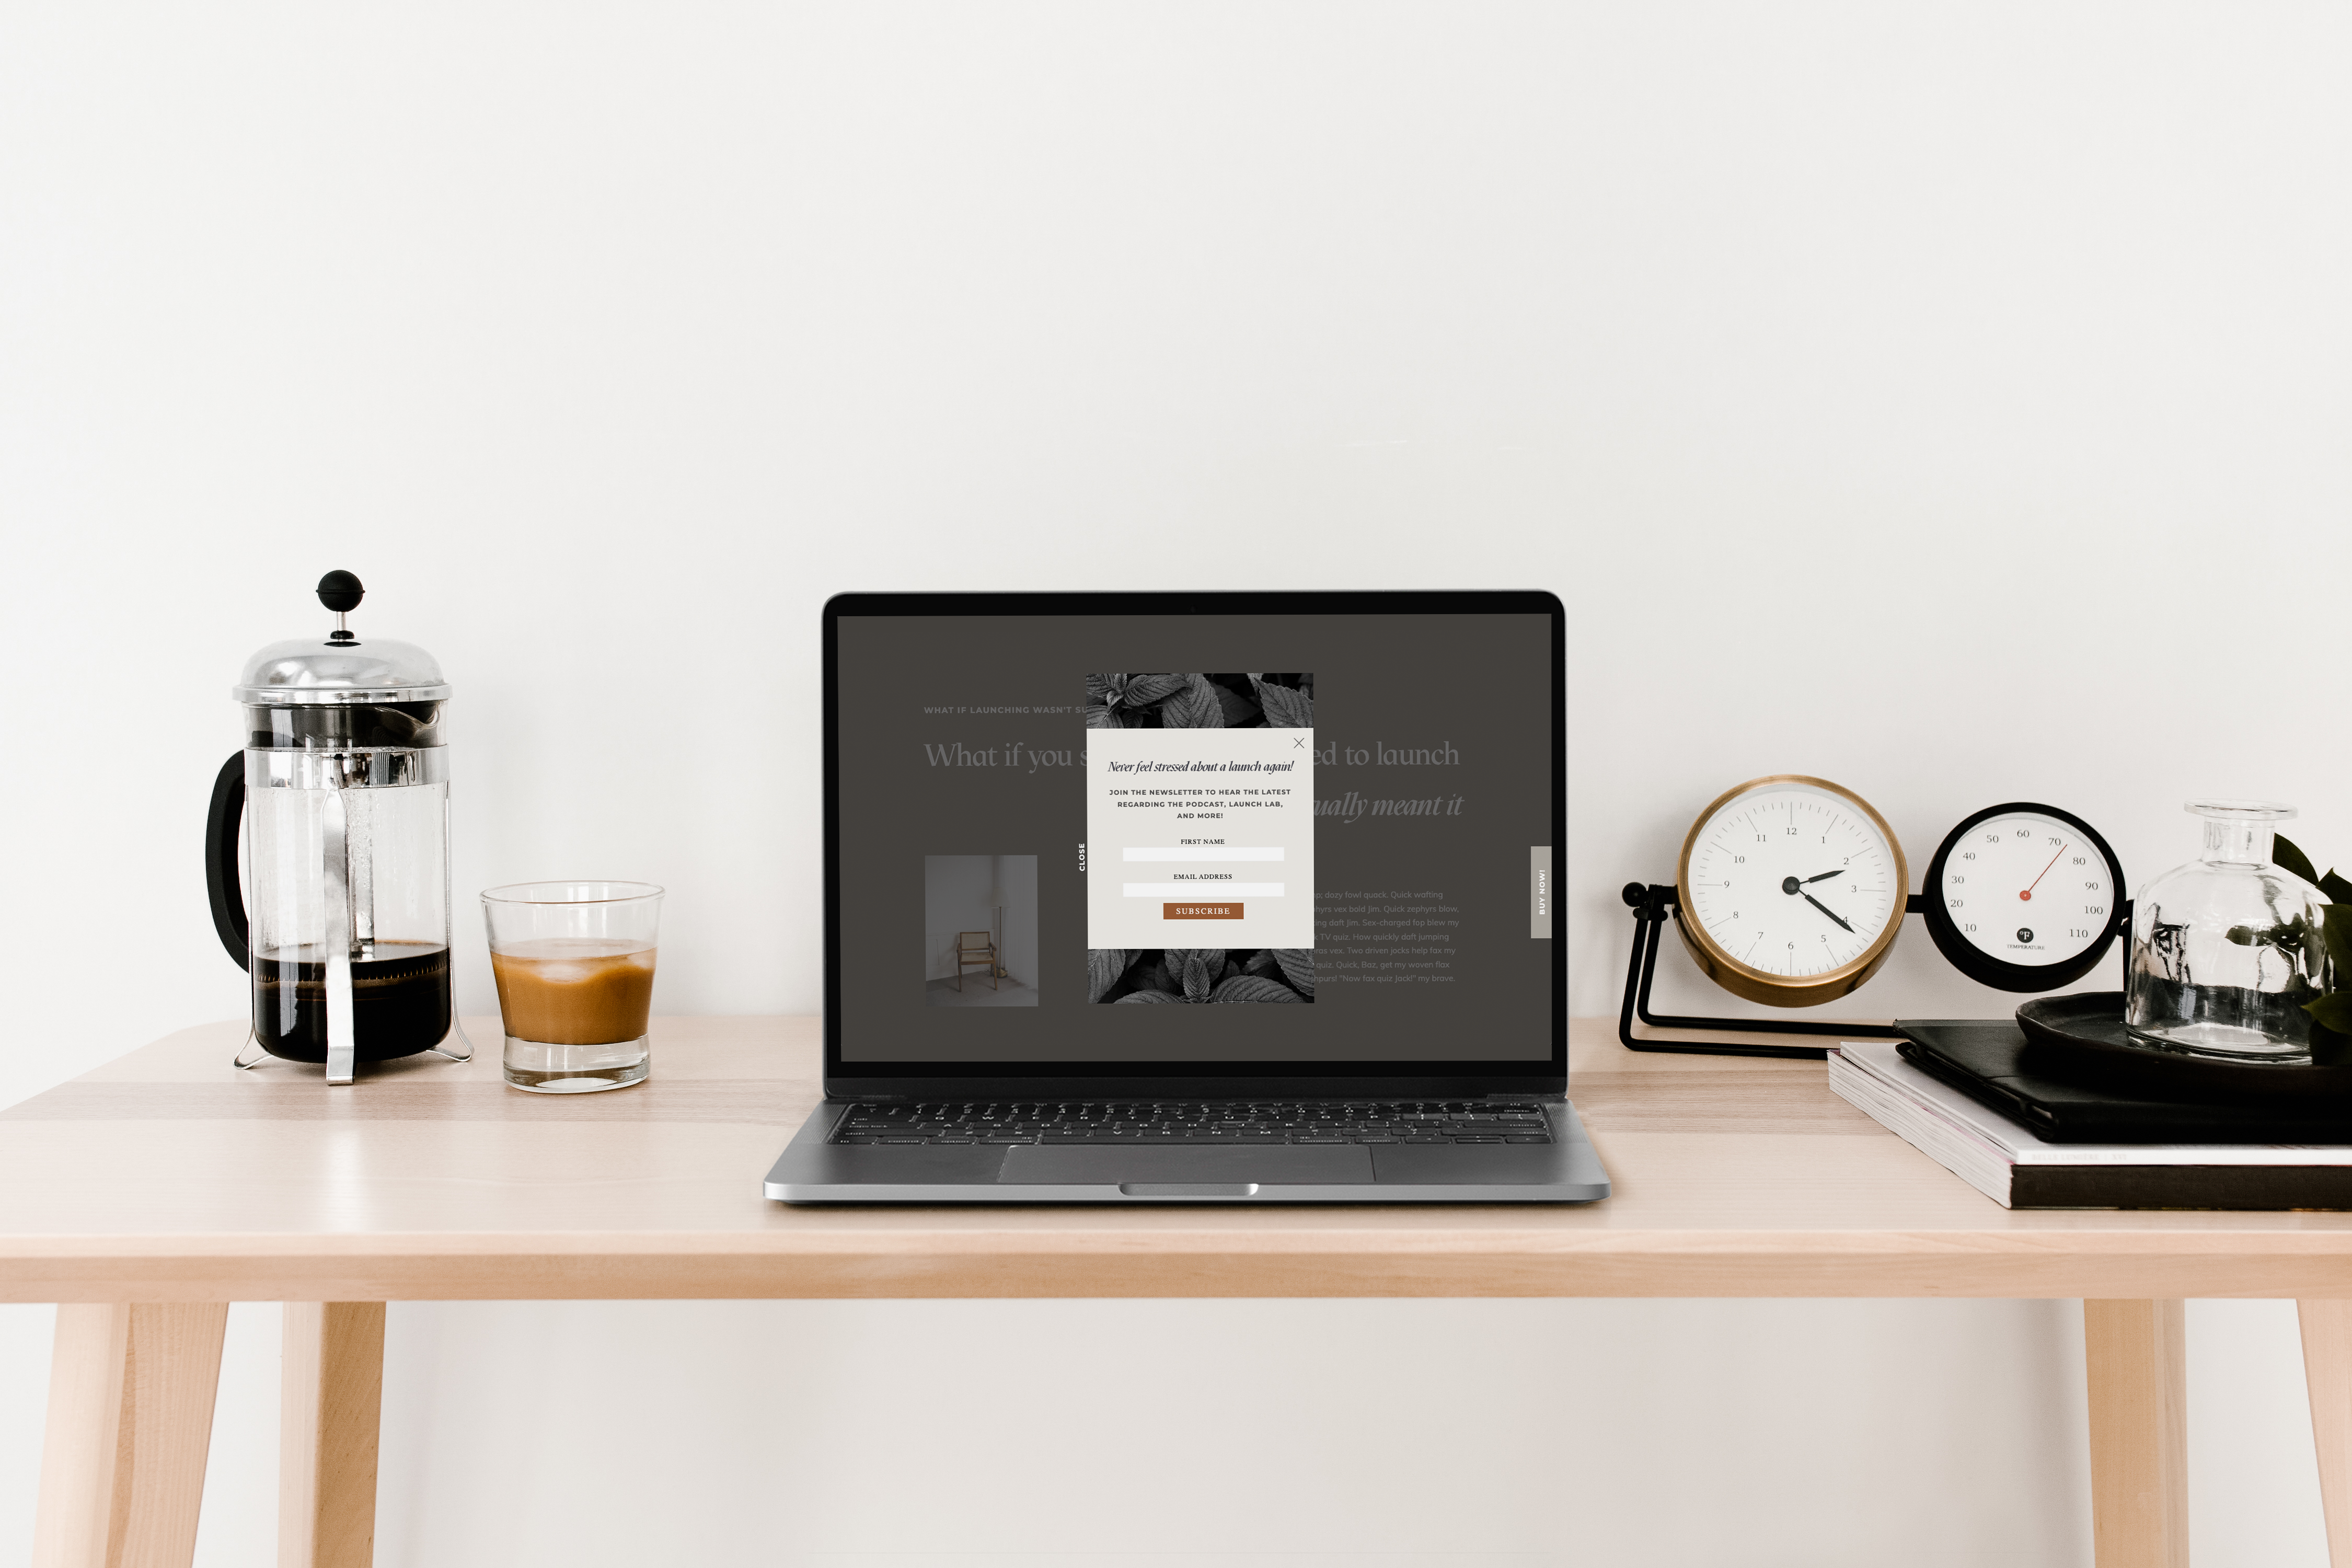
I know, I know. Pop ups can be very annoying as a user, but they are a great way to bring attention to a task that you’d like the user to take part in and they work! Obviously it’s extremely hard to ignore, and of course the user can always click out of it and continue exploring the website if not interested. Overall it’s a low risk addition to your website that most users now expect to run into when exploring a website.
Okay enough said, let’s get to it! In order to teach you this process I will be using our up and coming (and my personal favorite) Showit Website Template : Jolie & Jasper. This template comes with a popup on the home page, so I will show you the functionality behind the pop as well as how it is built for more customization options to play with (or incase that delete button was in the wrong place at the wrong time).
To start the process of building the popup, simply add a new canvas by clicking the three dots on the page tab and choosing ‘add blank canvas’. This will automatically be added to the bottom of the page, this is perfect and where we want it to stay. Scroll down to the new canvas. We are going to rename this, to ‘Popup’. To do so click on the three dots and choose Rename at the very top and type the new name into the text box that opens up. And save.
Now that we have a canvas to work with, let’s get some nitty gritty details out of the way before we get to do the fun parts, like designing the popup and playing with ways to use it. These details are going to look like a lot, but trust me this part will be fast and easy!
So here’s a speed round of the different tabs you’ll be working with and how the settings for each should be set up to work correctly (just make your settings match each image or play around with settings to customize your popup!)…ready… go!
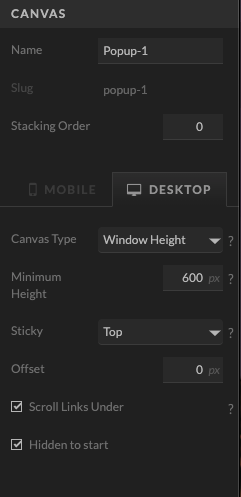
Canvas Settings
These settings will make the pop-up functional
- canvas type – window height (to fill the entire screen and demand attention)
- minimum height – size to how large you want this canvas to be in pixels (make the mobile canvas sightly smaller than the desktop)
- sticky – top (to not move with scrolling)
- check – scroll links under (so your buttons will continue to work)
- check – hidden to start (allows your popup to.. well pop up!)
Canvas Background
Play with these setting to change the design of your pop-up (below are a couple options to get started!)
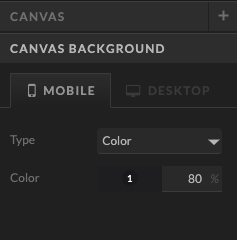
For a Black Out Look:
- color set to black or a dark color
- with opacity at 70-80%
*same one mobile & desktop
For a Floating Pop Up:
- opacity at 0% (will appear white in Showit but will be transparent in use)
*same one mobile & desktop
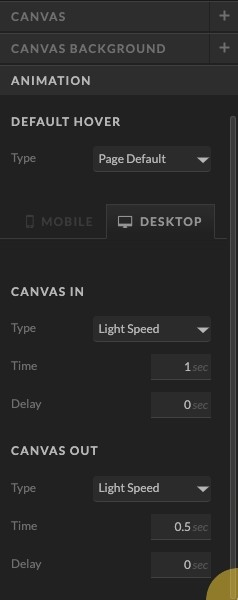
Animation
These settings will change how your pop-up appears on the screen. Play with how fast it pops up. I recommend leaving mobile untouched but feel free to play around with those settings as well.
View Transitions
These settings will also change how your pop-up appears on the screen. You can play with which direction the pop-up appears & disappears and how fast it pops up.
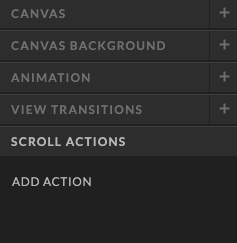
Scroll Actions
Though we will not be using this setting for the popup canvas it’s self it is a very important setting that will be used after building the popup on other canvases within the page, so we will be revisiting this later.
Congrats! You made it through the nitty gritty! Now time for some fun! I am going to be designing this popup to look identical to the one that comes with the Jolie and Jasper template, but feel free to play around and customize your popup just about any way you want (just be sure to keep all the key components).
These key components include: a color block to house the popup, image(s), buttons to close out of the popup, and embed code for the opt-in form. Once again these may sound daunting to take on but just like the settings I will slowly walk you through each component.
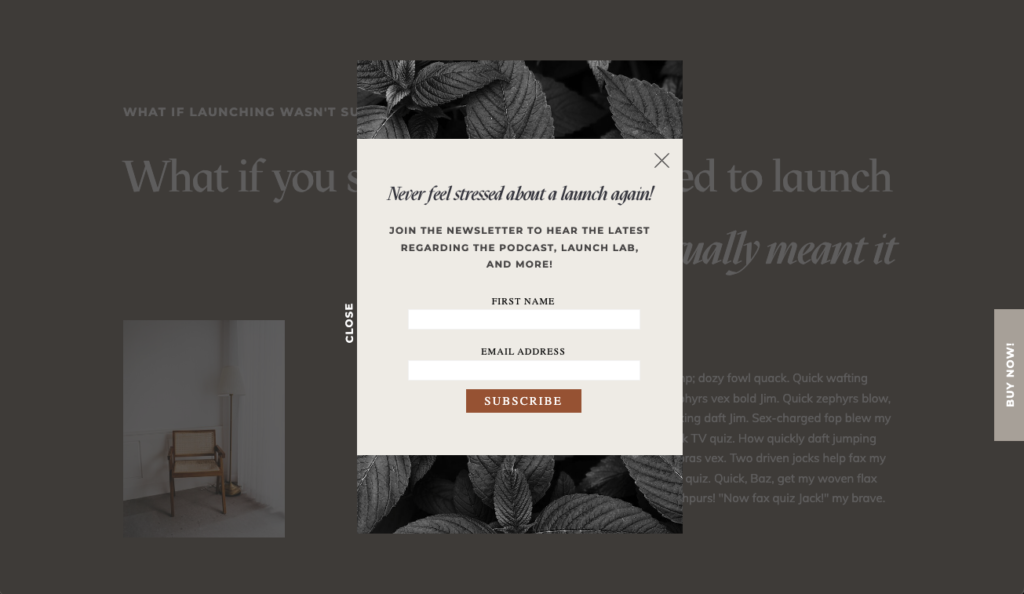
Adding a Color Block
Follow along as I add in a color block. I am using a simple rectangle but feel free to play around with changing the shape and size of your color block. Hover over the square icon in the center of the bottom navigation bar, and select rectangle from the menu. A rectangle will appear on screen! Play around with the settings to : change the color (shape style), change the shape (effects), and the size and location (size and position) on both desktop and mobile.
Adding Image(s)
Our pop up needs something exciting to grab attention and make thing more interesting! Join me in adding images to the pop up. I will be adding two identical images but feel free to play around with how many images and different images and sizes. Select the mountain icon in the center of the bottom navigation bar, and select the image you’d like to add from the media library and select add to page. The image will appear on screen! Play around with settings to : change the size (size and position), image settings (image), and the shape (effects) on both desktop and mobile.
Adding Text
Add text to the pop up with me! I will be adding two lines of text but feel free to play around with text styles and how much text you want on your pop up. Hover over the ‘T’ icon in the center of the bottom navigation bar, select heading from the menu. Play with the setting regarding this text : size, color, spacing, etc. (text style), and size and location (size and position), as well as what the text will say (on screen) on both mobile and desktop. And repeat for a subheading! Hover over the ‘T’ icon in the center of the bottom navigation bar, select subheading from the menu. Play with the setting regarding this text : size, color, spacing, etc. (text style), and size and location (size and position), as well as what the text will say (on screen) on both mobile and desktop.
Adding Buttons to Close Popup
This step is arguably the most important for your pop up, so don’t skip it! Your user is going to need a way to close out of the popup to continue on your website. Hover over the square in the center of the bottom navigation bar, select icon from the menu. A smily face icon will appear on screen! Play around with the settings of the icon : change the color (icon settings), select an icon (icon chooser), and size and location (size and position) on both mobile and desktop. Now for the extra step that makes this button work, click actions, actions select ‘+add’, first drop down select ‘hide canvas’, second drop down select ‘this canvas’. And now you’ve got yourself a working button!
I’m going to add one more button to be safe! Hover over the ‘T’ icon in the center of the bottom navigation bar, select subheading from the menu. Play with the setting regarding this text : size, color, spacing, etc. (text style), and size and location (size and position), as well as what the text will say (on screen) on both mobile and desktop. Now for the extra step that makes this button work, click actions, under actions select ‘+add’, first drop down select ‘hide canvas’, second drop down select ‘this canvas’.
Adding Embed Code for Opt-in Form
Follow along as I add in an embed code for an opt-in form. Hover over the square in the center of the bottom navigation bar, select embed code from the menu. A box will appear on the screen! Resize this box (size & position) to fit within the left over empty space on the pop up (making sure to leave a boarder from the edge). You will then add in your code (embed info) and save, this embed code will be for an opt-in form.
Hey there, you still with me?? I know it’s a lot of settings and tiny details. But you’re doing great! Now just to put this popup to use! This is where you can have a bit more fun and decide just how much you want to nag your users with popups.
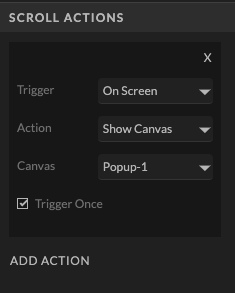
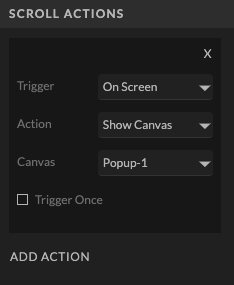
Adding Scroll Actions
When adding scroll actions go through your webpage and select a canvas (or a few) to add scroll actions to. The more you have the more the popup will appear and nag your users.
Once you’ve decided which canvas/canvases you want to add a scroll action to.
- Select – Add Action
- Tigger – On Screen (appear / pop up on scroll onto the screen)
- Action – Show Canvas
- Canvas – YOUR POPUP (Popup-1)
- Check or Uncheck – Trigger Once
Now this last selection comes down to just how much you want to nag your users. This is how I like to call – “to trigger once or to not trigger once”
This selection works just as the name promises to check the box is to only have the popup appear once as the user is on the section this setting is specified to.
To not check the box allows the popup to appear each and every time the user scrolls on the section this setting is specified to.
More Questions?
If you have any questions as to how to do anything within your Showit website feel free to send us a message requesting a walkthrough!
free

Get Access Now!
